Ensuring Consistent Chick Quality
By Scott Martin Hatchery Specialist Cobb World Technical Support Team
Features Breeders Health Poultry Production Poultry Research Production ResearchMaintaining chick quality from the hatchery requires careful quality control measures
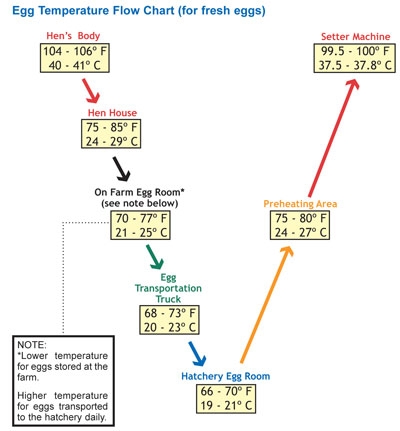 Egg temperatures should decrease and increase following a perfect ‘V’ pattern from the farm to the hatchery.
 Forecasting how many broiler breeders we need to supply customer orders is a critical part of an efficient, profitable business. So is being able to take full advantage of the genetic potential of today’s breeds.
One critical part of the process, converting hatching eggs to chicks, is vitally important and some practical steps to help accomplish this can be quite helpful. There are three things to focus on: egg quality, effective hatchery management and chick quality.
Egg quality
The first stage is monitoring the quality of the egg pack coming into the hatchery and maintaining this quality before incubation. But what is allowed into the hatchery?
Be sure to evaluate the egg pack for size, dirt, cracks, deformities, double yolks, inverted placement and uniformity.
Standards within hatcheries should be made to ensure consistent quality and all departments must follow it. All these criteria, if not measured against standards, can negatively impact results.
In addition, egg quality can also be influenced by:
- Size – a chick’s weight is usually 67- 68 per cent of its original egg weight (multistage incubation), so a small egg results in a small chick. Chicks below the minimum size will dehydrate very rapidly after hatch.
- Dirty eggs – can result in severe bacterial contamination, which could result in eggs exploding at transfer or omphalitis in baby chicks.
- Cracked eggs – do not hatch, but eggs with micro-cracks will hatch around 50 per cent of the expected rate and all chicks that hatch will be culls.
- Deformed eggs – can cause the chicks to mal-position, which in turn reduces hatch and chick quality.
- Double yolks – should be culled.
- Inverted eggs – will hatch approximately 40 per cent of the expected rate and the chicks produced will be culls.
- Uniformity of air flow – if present throughout the incubators, the hatch window decreases and will allow for a much more efficient pull time.
Next, a good egg holding program should be implemented from the farm to the incubator. The temperature of an egg at lay is approximately 40oC (104oF). From there, egg temperatures should decrease and increase following a perfect ‘V’ pattern, with the lowest temperatures occurring at the hatchery.
Starting on the farm at 40oC (104oF), the egg temperatures may fall to typically 20oC (68oF) in the hatchery, and then rise again to incubation at 37.6oC (99.7oF). It is extremely important that egg temperatures do not fluctuate away from the V-shaped pattern.
Temperature fluctuations will cause embryonic mortality and loss of hatch. The temperature is all the egg holding areas must be monitored – the breeder house, breeder house egg room, transportation to the hatchery, hatchery egg storage and pre-warming.
Effective hatchery management
There are four important programs to use in a hatchery: quality assurance, set-transfer-to-pull, sanitation and preventive maintenance.
A quality assurance program consists of egg assessment as already described, embryo diagnosis and chick quality assessment. Monitoring these three components correctly is a hatchery manager’s most valuable tool.
Egg assessment can tell what is going into our incubators, embryo diagnosis will troubleshoot hatch problems and chick quality assessment will determine how well incubation and hatchery programs are working via examinations of percentages of hatch, fertility and hatch of fertile. This will enable us to diagnose problems and effect solutions.
Additionally, when performing an embryo diagnosis, it is important to be accurate and consistent so the results can be used as an information tool. This can identify certain problem incubators or rooms, and certain days when issues occur.
Set-transfer-to-pull
Our target is 504 hours of incubation — exactly 21 days. As an example, if the eggs are set at 5:00 am, then they should be ready to pull 21 days later at 5:00 am. If we are under or over this target, then we have problems during incubation.
The hatch window should be targeted at 33 hours or less (multistage) from first to last chick. The shorter the hatch window, the better the chick quality will be.
Transfer should take place between set and pull, where eggs are taken out of the setter and the egg flat and put into the hatcher and hatcher trays, and be smooth and efficient. Eggs should not be left out for a prolonged length of time.
Additionally, extreme care should be taken to prevent cracked eggs, which are especially important when moving eggs into the hatcher.
Changing set time, transfer time or pull time will affect the baby chick. Be careful before altering this plan — know the cause and effect before making a change, since eggs cannot be set on a random schedule. Rather, strict programs must be implemented and followed to maintain quality and control.
Sanitation
Hatcheries should be cleaned and disinfected continuously. The most important task is removing all organic material before disinfecting, which can hide in corners, under racks, on wheels and in any crack or crevice in a setter or hatcher.
All material has to be removed; otherwise the presence of organic material will reduce the efficacy of disinfectant products to sanitize the surface area.
Be sure to use disinfection products effective against the challenge specific to the hatchery. A sensitivity test can be performed at your own or a local laboratory to identify the products, which are most effective against your specific bacteria or mold challenge.
Good air quality is also one of the best disinfectants available. It is important to ventilate and pressurize the hatchery correctly, which not only satisfies the oxygen requirements of embryos and chicks, but also prevents cross contamination.
Remember, too, that transport vehicles, which handle eggs or chicks, need to be part of the hatchery sanitation program.
Preventive maintenance
There are three kinds of maintenance: predictive, preventive and reactive. Reactive maintenance costs more than preventive maintenance, which costs more than predictive.
Since incubators run continuously, an incubator simply cannot be allowed to fail. If it does, it can be repaired, but all embryos in the incubator will have been affected. Therefore, programs should be in place to ensure incubator failures do not happen.
Predictive maintenance can be, and often is, overlooked, but it can be very useful, as it can tell from the lifespan of a piece of equipment or component when it should be replaced. Preventive maintenance — a great tool for budgeting — depends on checklists for the incubator and hatchery equipment and, if followed correctly, costly breakdowns can be minimized.
In all hatchery areas, temperature, humidity and pressure should also be monitored and calibrated for consistency at all times so incubators and ventilators can cycle properly.
Chick quality
While seven-day mortality is generally a good measure of chick quality, it is a lagging indicator. Often, when we hear of high seven-day mortality, the first action is to go back into the hatchery and retrace programs and procedures, but that is too late. A chick quality assessment in the hatchery needs to be in place beforehand to ensure good chick quality going to the farm.
It is also important to score chicks before they leave the hatchery. Evaluate red hocks, navels (open unhealed navels), heat buttons (navel has closed before the yolk was fully absorbed) and dehydration. There are different scoring systems that can provide a great tool for assessing different incubators if done correctly, and will show when a trend line starts to go negative. Besides, it also provides another indicator for how well your preventive maintenance program is working.
Chick temperatures
Rectal temperatures of baby chicks need to be taken at several time points: before pull, during chick processing, chick holding and at delivery. Temperatures need to be monitored to make sure they stay around the ideal range of 40oC (104oF).
Variance from the target temperature will affect broiler performance – chicks will not start properly.
Using a step-down temperature program and increasing airflow through the hatcher will help keep chicks from overheating, provided all your best management practices are in place and temperatures are monitored in the hatcher, separator room, chick room and transportation.
Pre-pull assessment
The pre-pull assessment can be done at different times to make sure programs are in place and working properly. Twelve hours before pull, 70-80 per cent of chicks should be completely hatched (out of the shell, but can still be wet).
Another time for pre-pull assessment is 24 hours before pull, where there should be less than 30 per cent hatched. And while performing a 12-hour pre-pull, it is a good time to monitor rectal temperatures. The target percentage of chicks hatched is according to the expected hatch percentage, not eggs in the tray. For example, if the tray contains 162 eggs and the flock expected hatch is 87 per cent, then there will be 141 chicks out when the hatch is complete. At 12 hours pre pull, 99 chicks (70 per cent of 141) will be in the tray.
Critical to meeting goals is having the correct standards in place and achieving them – from the incoming egg pack to the chick delivered to the broiler house. Remember to confirm that what you think you have is actually what you have.
Good management practices, and proper implementation of programs and standards, will help ensure maximum hatch efficiency and deliver consistently good chick quality.
Print this page