
Male Breeder Management
By By Jerry Garmon Technical Service Manager and Mark Hogan Technical Service Manager AVIAGEN
Features New Technology ProductionA comprehensive guide for achieving male performance
A comprehensive guide for achieving optimal and
consistent male performance in a breeder flock
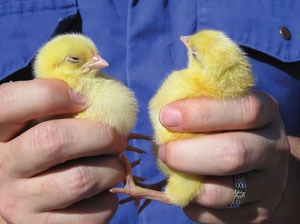 |
| Males need equal attention and it starts with early chick development. Crop fill 24 hours after placement is a good measure of success. (Above) The chick on the left has a full crop; the chick on the right has an empty crop. |
Males make up 50 per cent of the breeding flock. Attention to male management requirements must therefore be given the same priority as that of females. Male management should focus on control of skeletal development, bodyweight and feeding to produce enough good quality males to maintain fertility and hatchability throughout the life of the flock.
This article provides management recommendations that will achieve optimal and consistent male performance for the breeding flock with specific focus on North American and Canadian poultry production conditions.
Brooding (0-2 Weeks)
Management during the brooding period is critical as it has a lasting influence on the health and performance of the chick. The aim during the brooding period is to ensure good early chick development and bodyweight uniformity. Chicks should be provided with a good basic brooding set-up that provides proper access to light, heat, feed and water.
Light – Proper distribution of light during the brooding period is critical to ensure chicks can see to eat and drink. Light of the correct intensity should be distributed evenly throughout the brood chamber. For the first 3 days, provide 23 hours of light at an intensity of
1-2 foot candles (10-20 lux). An initial intensity of 10 foot candles (100 lux) used within the brood chamber can be used to stimulate chick activity. Beyond 3 days, the amount of light given should gradually be reduced so that by day 10 a constant day length of 8-12 hours is reached. During this time, light intensity should be maintained at 1-2 foot candles (10- 20 lux).
Heat – The chick is highly dependent upon external heat sources to help maintain proper body temperature until approximately 2 weeks of age. Heat can be provided by many sources (jet brooders, radiant brooders, forced air heaters and radiant tube heaters). Regardless of the heat source used, the following management practices are recommended:
- Preheat the brooding chamber for 24-48 hours before chick placement depending on climate, litter conditions and season. A heating system that warms a spot on the litter for the birds provides the best start.
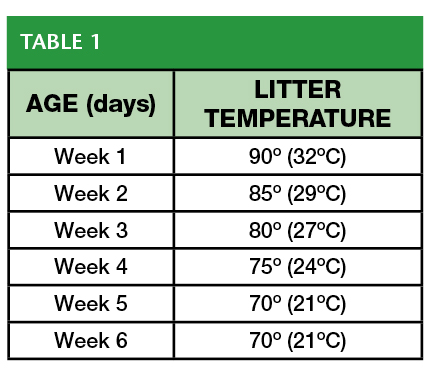
- Typically under North American and Canadian conditions litter temperature at placement should be 32˚C.
- Beyond day 1, follow the temperature profile given in Table 1.
- Maintain relative humidity (RH) at 60-70%.
- Monitor temperature and humidity regularly.
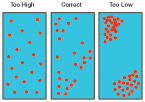
- Closely observe chick behavior during the first 24 hours after placement. If behavior indicates that the temperature is not correct (Figures 1 and 2), check and adjust temperature settings accordingly.
 |
The temperature experienced by the chick is dependent upon the dry bulb temperature and relative humidity (RH). High RH increases the apparent temperature at a particular dry bulb temperature, low RH decreases apparent temperature. For example, the dry bulb temperature required to achieve 32°C is 35°C, but if the RH is 80%, the dry bulb temperature required to achieve 32°C is 28°C. In North America and Canada, higher brooding temperatures of up to 35°C (at the brooder edge at chick height) are not uncommon. These higher temperatures may be required when RH is low, when the efficiency of the heating system is poor or when draught exclusion is ineffective and when males are kept in a separate pen at one end of the house.
If chicks appear chilled and are inactive at placement (chicks should begin to drink and feed within 1-2 hours of placement), increasing the temperature by 1oC will stimulate chick activity, feeding and drinking behavior. The temperature setting can be returned to normal on the second day although chick behavior should ultimately determine decision making.
Feed – Chicks should be on an every day feeding schedule during the brooding period. Supplemental feed should be given for the first 5 to 7 days providing 1 supplemental feeder tray for every 100 chicks. Pan feeders should be flooded with feed for the first 7 to 10 days to promote feeding activity. Both the pan and the supplementary feeders should be placed within the comfort zone of the heat source.
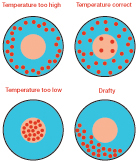 |
| FIGURE 1 |
|
| FIGURE 2 |
The Starter feed should be of a physically acceptable quality and either a course mash or, preferably, a sieved crumb (for further information on male starter rations refer to the parent stock recommendations for the breed). The provision of paper (which can cover up to 100% but not less than 25% of the litter in the brooding area) onto which food can be directly placed can be beneficial in encouraging chicks to eat.
Water – The provision of clean, fresh water which is readily available is essential. Inadequate water consumption can lead to dehydration and may lead to mortality and bodyweight uniformity problems later in the growing period.
- Adequate drinking space for 1000 day-old chicks is provided by 5-6 standard bell drinkers each measuring 15.7 inches (40cm) in diameter and 10-15 supplementary mini drinkers of 5.5-8.0 inches (15- 20cm). Supplemental water can also be provided in easy-fill drinkers (1 per 200 chicks), and snap-on drinkers on a nipple system (2 per 100 chicks).
- Supplemental drinkers should remain in place for the first 3 to 7 days and should be positioned within the comfort zone of the heat source so that chicks do not have to travel more than 3.3 feet (1m) for access to water.
- If drinkers are filled manually they should be filled during the pre-heating period. It is important that water is delivered to the chicks at an appropriate temperature. Chicks should not be presented with cold water as this can lead to chilling, however water temperatures should not exceed 68°F (20°C).
Crop Fill – Crop fill is a good measure of a successful chick start. Chicks should have a full crop (see page 26) as soon as possible after placement.
- 80% of chicks should have a full crop 8 hours after delivery.
- More than 95% of chicks should have a full crop 24 hours after delivery.
To assess crop fill, randomly select 30 or 40 chicks and gently feel the crop of each chick. In chicks that have found food and water the crop should be full, soft and rounded. If the crop is full but the original texture of the crumb can be felt the bird has not consumed enough water.
Growing (3-22 Weeks)
Separate Rear – Separate rearing is the preferred method for controlling skeletal-frame growth and bodyweight as it allows males and females to be grown to specific and separate bodyweights throughout life.
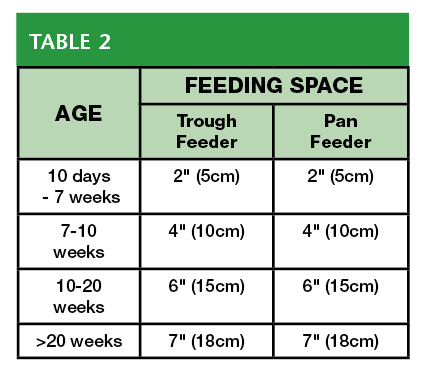
Feeding – There should be enough feeding space to allow all males to eat simultaneously. This ensures uniform feed distribution and prevents over-crowding at the feeders. Feeding space should be gradually increased from 2 inches (5cm) at 3 weeks to 7 inches (18cm) at 22 weeks (Table 2).
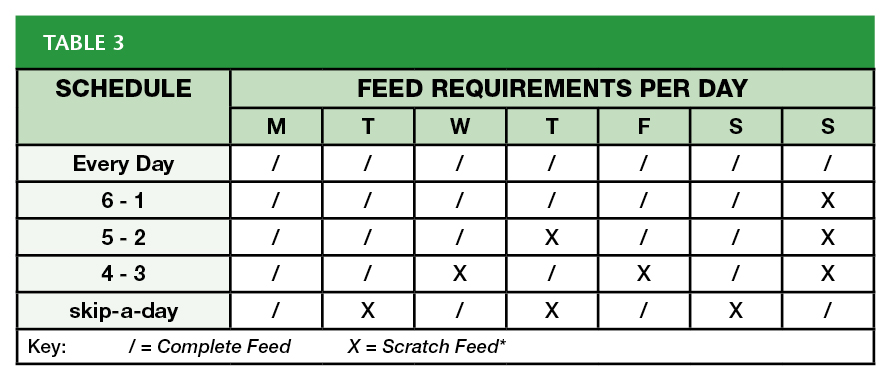
Growing separately reared males on an every other day feeding program will promote good uniformity. If feed impaction becomes a problem, other schedules may be used (e.g. 5 and 2, 4 and 3, or every day – Table 3).
 |
For more information on feed nutrient specifications for males during the growing period, refer to the parent stock nutrition guide for the breed. Weekly feed increases should allow the male to achieve the target weight goal being used.
Water – From 3 weeks of age provide drinking space by:
- automatic circular or trough drinkers: 0.6 inches per bird (1.5cm per bird)
- nipples: one for every 8-12 birds
- cups: one for every 20-30 birds
Water restriction should begin at the same time as initiating every other day feeding, with water being available with feed and for 2 hours after feed has been consumed. Males can consume large amounts of water on the off-feed day and the litter will become wet if water consumption is not controlled (1 hour in winter and 2 hours in the summer). Wet litter tends to increase ammonia levels and increases the risk of contact burns of the foot pads, which may develop into bumble foot in the adult male.
Lighting – Males grown separately should have the same lighting program as the females with which they are to be mated. Birds should be reared under a constant day length of 8- 12 hours at an intensity of 1-2 foot candles (10-20 lux). If feather pecking occurs, reduced light intensity may be required.
Bodyweight Control – During the growing period, male bodyweights should remain on target with the weight goal being used. Weekly estimates of bodyweights must be made throughout the growing period to determine if target weights are being achieved and to allow accurate decisions regarding feed allowances to be made. To determine a true representation of flock growth and development:
Randomly select a sample of 50-100 males (or approximately 15% of the population).
Weigh all birds in the sample.
Weigh birds on the same day each week, at the same time and preferably on the off-feed days or at least 4-6 hours after feeding.
If average bodyweights are found to deviate from target bodyweight by more than 0.20 lb (90g) then corrective action should be taken.
Males that are below target prior to 12 weeks of age will have poorer uniformity, a smaller frame size and a decreased feed efficiency. To correct this problem the following steps should be taken:
- Initiate the next scheduled feed increase and increase the size of the next scheduled feed increase until bodyweight is gradually brought back on target.
As a rule of thumb, for every 0.10 lb (50g) under weight, a bird will require an additional 13 kcal ME per bird per day beyond the normal feed increase to recover in one week.
If, historically, males are consistently found to be below target, keeping birds on the Starter feed for longer will help maintain target weights prior to 12 weeks.
Males that are over weight prior to 12 weeks of age will have poor uniformity, a large frame size and reduced feed efficiency in lay. To correct this problem:
Do not reduce feed lower than the current feeding level.
Decrease the amount of the next feed increase.
Hold feed / delay the next feed increase.
Weight gains after 12 weeks must be consistent if males are to be properly fleshed at 20 weeks. If target weight gains are not achieved by 12-15 weeks of age a new profile which runs parallel to the published target should be drawn and adhered to.
 |
Mix Rear – Growing males within the female population is common practice in some regions. At placement, males are segregated from the female population by a bird proof partition into a pen at one end of the brood chamber. Once the males reach the proper target (release) weight, they are released into the female population.
These target weights should typically be achieved at 4 weeks of age. If males are not achieving the release weights around this age early nutrition and brooding practices should be reviewed.
Note: If the male is to be grown with females that have more aggressive appetites than the parent stock products, the male weight will need to be increased prior to release.
Males should not be released into the female pen until the release weight has been reached. Males need to be in good condition when released into the female pen in order to cope with the increased competition for feed and difference in feeding levels that will occur when they are mixed with the female population.
Feeding – Feeding space should be increased from 2 inches (5cm) at 10 days to 7 inches (18cm) at 20 weeks. When mixed rearing, feeding space and feed availability are critical.
To allow sufficient access to feed there should be no more than 20 birds per feed pan in the male pen at placement. The pans should be set to allow a minimum of 50% more feed through the feed drop than the female pan receives. Following this feeder set-up normally eliminates the need for extra feeding by hand.
Chain feeders pose challenges in achieving target weight and acceptable uniformity. Where chain feeders are used, place the pen petition so that it provides no less than 6 inches (15cm) of feeder space per male. This normally requires a 90 foot (27m) long pen if equipped with 4 lines of chain feeder. Feeder run time should be set to ensure a full trough of feed is maintained in the male pen.
Water – The provision of drinking space for males that are mixed reared should be the same as that for separately reared males.
Lighting – As with separately reared males, mixed reared males should receive the same lighting program as the females to which they are to be mated.
Uniformity – Bodyweight gain and uniformity are key to achieving success in mixed rear and should be measured weekly from no later than 3 weeks of age – ideally from placement. Low bodyweight gains and/or poor uniformity are an indication of insufficient feeder space in the starting pen. Insufficient feeder space can be caused by:
Accumulation of litter in the feeding system – to avoid this, litter should be cleaned out of the feeding system daily.
Failure to completely charge the feeding system – when the feeding system is found to have incomplete charge provide enough extra feed on the next feed day to fully charge the system.
Improving Poor Uniformity
Poor bodyweight uniformity in males increases the risk of higher mortality throughout the life of the flock. If uniformity of skeletal frame size and bodyweight in the male population becomes an issue, there are techniques that can help to improve this.
Separate Rearing – Separate rearing is the preferred method of rearing males but it can create unique challenges if male uniformity is poor. If the uniformity of the males in a separately reared group is poor, one method of improving uniformity is to mix the top 40% of the males with the females at 7 weeks of age, growing them mixed until movement. The under weight males remain in the male pen where competition for feeder space is reduced. Feed increases should be made which will bring the males to their target weight by 12 weeks.
Another method used to grade the males during separate rearing involves constructing a pen within the male chamber and grading the small males into this pen. Small males should be kept in this pen where they can be provided with an increased feed amount to allow them to achieve the target weight. As these males progress in bodyweight gain, they can then be graded out into the heavier male population as they achieve target weight. The challenge is building a bird proof pen and hand feeding the small males. Also, the small pen will contain feed every day which can create problems for the heavier birds on their off-feed days.
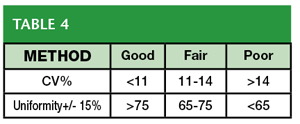
Mixed Rearing – If the uniformity is poor in mixed rearing (Table 4) corrective action/grading should occur. Grading allows the lightest males in the flock to recover weight gain and evens out skeletal frame size by reducing competition for feeder space while slowing the gain of the heavier males. Males should be graded into the female pen at 4 weeks using the 4-week weight goal as a standard.
To grade a flock, weigh a sample and establish the birds that are heavy enough (birds that have achieved the 4 week target) to be mixed with the females. Lighter males remain in the male pen until 5 weeks when the process is repeated using the 5-week weight goal as target. Flocks with moderate uniformity problems will require 2 gradings. Flocks with severe uniformity problems will require 3 gradings, the last being at 6 weeks of age. In the first week that the males are with the females after grading, they will typically have little or no weight gain but should recover 2-3 weeks after placement. This is why it is important that males are of the desired weight before being mixed with the females.
Breeding (23-65 Weeks)
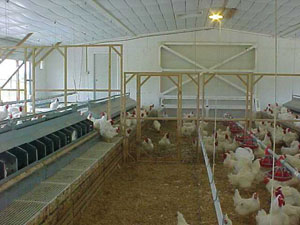
Feeding Equipment – Winched Feeding Equipment: Winched male feeder systems have an automated electric winch system that allows the feeder to be filled over head before it is lowered for feeding. The number of pans should allow 7 inches (18cm) of feeding space per bird. This type of feeder does not require a tube program for distribution but does require enough pans to accommodate a full days feed at the maximum amount for the house. Under typical North American/Canadian conditions, the number of males per pan should not exceed 10. Ideally feeders should be raised after feeding to deny access. Feed allocation for the next day can then be added and feeders are lowered again at feeding time. This ensures uniform feed distribution. Where males are full-combed it is essential that proper adjustments are made to the feeders to allow feeder access. Shocker cables should be used on this type of equipment to prevent females from perching on the tube and eating male feed.
 |
Floor Feeding: Male feeders with no electric winch system must be programmed so that feed drops into all pans when the operation begins. The lower limit micro-switch in the hopper and the control pan must work together to ensure that the auger tube remains charged with feed. Some operations have found that proximity switches are more reliable for these controls. Depending on house length, the charge of feed in the auger tube may be lost if feed levels are below 20 lb per 100 birds per day (90g per bird per day). When this occurs, extra feed should be provided to recharge the system and maintain feed delivered to the male.
Feeder Height: Regardless of the feeding system used it is essential that feeder height is correctly adjusted to limit access by females but allow all males equal access to the feed. Care should be taken to avoid litter build up or depletion from under the male feeders. Correct male feeder height should be maintained by routine observation and adjustment and will be dependent upon male size and feeder design. Feeder height should be in the range of 2.0-2.4 inches (50-60cm) above litter.
Feeder Pans: Feeder pans should be securely fitted to the tube to prevent rotation and restriction of feeder space. Secured pans that become tilted on the tube indicate that the feeding system is set too high.
Timing of Feeding: Where possible, males should preferably receive their feed slightly after the females (approximately 5 minutes). This will help to minimize the stealing of male feed by the females.
Feed Quality and Nutrient Speci-fication: The feed given during the breeding period should be of an acceptable quality and nutrient content, supporting male condition and fertility.
Scales: The scales used to weigh male feed vary in sophistication. Whatever type of weighing equipment is used, accuracy is the key to controlling male bodyweight and the scales must be sensitive enough to accurately weigh male feed, be installed correctly, calibrated and checked regularly. The most accurate systems are those that auger the feed directly into the male scale, placing the measured amount directly into the male feeder. The least accurate systems involve using the female scale to weigh the male feed. The male feed is then passed through the same auger as the female feed falling through an extra drop in the auger. Such systems are prone to error in weights and delivery, requiring constant monitoring for accuracy.
Scales should be checked for accuracy during the first week birds are in the breeder house. Scales may be checked with a known weight or by removing a days feed from the hopper and weighing it with an accurate scale. Investment in accurate male feed weighing systems is recommended.
Watering System – Male drinker lines typically consist of a line of nipple drinkers in the scratch area. The system should have enough nipples to provide 1 for every 8-10 males or, alternatively, enough bell drinkers to provide 1 for every 20-30 birds. Nipple drinkers are beneficial if they are managed so that water flow rate ensures adequate water delivery without causing water wastage and wet litter.
Feeding Program – After mating, males and females should be fed from separate feeding systems. This allows the effective control of bodyweight gain and uniformity for each sex. Separate sex feeding takes advantage of the difference in head size between males and females. Excluding males from the female feeding system is an essential part of male management during lay. The most effective method of restricting male access is to fit grills to the female feeding system.
A grill with a horizontal bar or wire set at 2.25-2.5 inches (57-64 mm) or a 1-1.25 inch (25-32 mm) PVC pipe secured to the inside peak of a standard high profile grill – in conjunction with a full comb on the male – will restrict males during the early period of production. Normally this type of grill has a width of 1.68 or 1.75 inches (43-45mm).
 |
| FIGURE 3 Example of fleshing scores |
Male Fleshing – In addition to recording male bodyweights it is important that male condition or fleshing is monitored. An assessment of fleshing will establish if males are correctly fleshed for skeletal size (for example, incorrectly fleshed males would be smaller skeletal frame-sized males that are over fleshed or larger framed males that are under fleshed). Lean, well conditioned males are more active and will complete more matings than heavily fleshed males.
Fleshing should be evaluated during 3 critical periods of the bird’s life:
16-23 weeks
30-40 weeks
40 weeks to depletion
Fleshing scores can be obtained while weighing males by using a scoring system of 1 to 5 (Figure 3). A score of 1 means the bird is too thin and a score of 5 means the bird is too heavily fleshed. A score of 3 is desired and considered the best practice.
Spiking – During mating, the male to female ratio should be 10% (good quality males). Over time, the male to female ratio will decline due to male mortality or morbidity. When ratios reach 8 males per 100 females, additional males should be added to the flock to return the ratio to 10 males per 100 females. Spiking will assist in maintaining the optimum male to female ratio and the life-long fertility of the flock.
 |
| FIGURE 4: male pen |
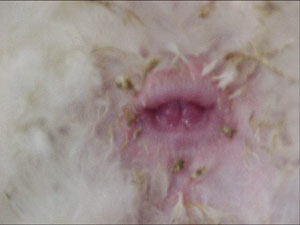
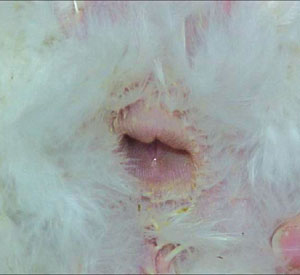
Before spiking, walk through the flock and remove any unproductive males. Do not allow cull males to remain in the flock. The obvious culls will be easy to locate and remove but over weight males that are not breeding will be harder to find. These males will normally have a full coat of new feathers and the fluff around the vent area will be intact. Figure 5 depicts the vent of an active male versus that of an inactive male.
Males used to spike, must weigh at least 8.5-9.0 lb (3860-4085g) and have been light stimulated for at least 3 weeks. Young, under weight males cannot compete with other adult males, resulting in starve-outs. Weigh the young spiking males separately from the original flock for at least 4 weeks subsequent to entering the flock to ensure they are eating properly. Increase feed amounts for 3 to 5 days after adding males and lower the male feeder height to accommodate the young males.
Male Pens – Holding pens are used to mature young spiking males and condition them for entry into a mature flock (Figure 4). The male water line and feeder extends into the male pen. In this pen the restriction grill is removed from the female feeder to provide 1.5-2.0 inches (4-5cm) of feeder space per male – allowing control of feed volume through control of feeding space. To calculate feed requirements the male head count in the pen is added to the female head count. Males can be removed from the pen and introduced into the general population after 2-3 weeks when signs of maturity are evident. Providing a cross section of the house reduces fighting and improves livability in the pen. When the males are released, the females will move back to the pen area and use the nests.
Conclusion
 |
|
| FIGURE 5 Vents of an active (L) | and inactive (R) male |
The objective of male management is to promote and maintain fertility throughout the life of the flock by providing a sufficient number of good quality males (males of good condition, with uniform growth, bodyweight and skeletal development) throughout the life of the flock. Since males make up 50% of the breeding value of a flock, management practices for males must receive equal attention to that given to females.
As with all parent stock management advice, the final results will depend upon the amount of input at farm level. If the correct basic techniques are followed with regard to management of males during brooding, rearing and breeding then optimal fertility and hatchability levels can be achieved for the life
of the flock.
Print this page