Reducing Floor Eggs
By David Engel Cobb technical service manager – Eastern Canada
Features Bird Management Production but they also lead to poorer chick quality. Floor and slat eggs can be a huge problem in a breeder flock. Not only do they lower hatch and production for the hatchery Poultry Production ProductionTips on how to do it in a community nest system
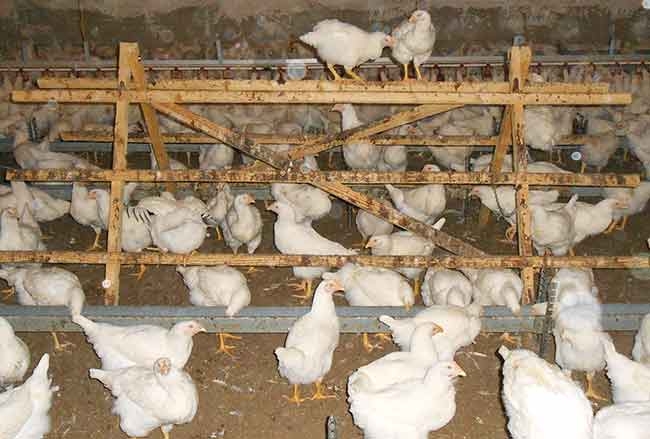 Training females to go into the nest begins in the pullet barn. Stimulating jumping by placing something such as a perch rail (shown here) will work, but it has to be done early, when the birds are between three and four weeks old.
Floor and slat eggs can be a huge problem in a breeder flock. Not only do they lower hatch and production for the hatchery, but they also lead to poorer chick quality. More importantly for the farmer, this leads to lower profit and increased work picking up these eggs.
Many management techniques are used to help reduce this problem. These are some of the ideas that have been used by many producers.
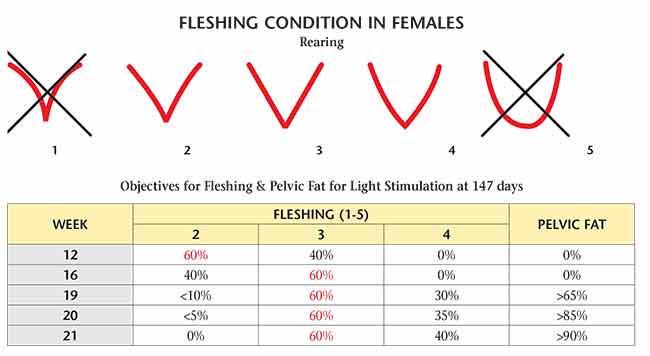
BODY CONDITION
The most important factor in reducing floor and slat eggs is simply — if it were really that simple —to have the birds in the proper condition at light stimulation. This means having them developed with the correct fleshing and fat reserve. This will be a key factor to the birds developing the natural instinct to go to the nest to lay their eggs.
Having the birds in the right condition at lighting is heavily influenced by ensuring the correct bodyweight gain from 16 to 20 weeks of age has been achieved. We are looking to have the birds gain 33-35 per cent in bodyweight from 16 weeks to 20 weeks old. By doing this we are likely to have the correct fleshing and adequate fat reserve. Often with flocks over the bodyweight standard at 16 weeks, we are tempted to try and control the weight gains from that point and have the birds on the target at 20 weeks. This results in the birds not gaining enough weight relative to their 16-week bodyweight and therefore not being in the proper condition at 20 weeks of age.
When deciding what the correct bodyweight is, you need to keep two things in mind: What line of females you are using, and when will the birds come into production. The line of the female is important as different lines have different bodyweight targets for lighting. For example, the Cobb 500SF requires a heavier bodyweight at lighting than the Cobb 500FF. Typically, flocks that will be coming into production during decreasing day lengths also require a heavier bodyweight at lighting.
Another aspect to consider, especially when moving into a solid wall production barn, is the amount of natural light coming into the barn. You may be keeping the birds on eight hours of light after transfer believing you are not light stimulating the flock. In reality, in many cases, so much light is leaking into the barn that the females are light stimulated from the day of transfer. Even though these birds may be moved at a time that technically they are “in season” flocks and would normally be on a lower bodyweight standard, because of the early light stimulation they should be reared on a heavier, ‘out of season’ standard. This will help make sure the birds are ready for the light stimulation and ready to go to the nest. This is especially important for the Cobb 500SF.
Having the birds in the correct condition means meeting some guidelines for fleshing and reserve. To check this we need to pen up enough females (around 50) to get a good idea of the condition of the flock. In scoring the females, we want to see 95 per cent of the birds scoring a 3 or 4 on fleshing and at least 90 per cent of the birds with pelvic fat. If we have this, the flock should be ready to receive light and ready to go to the nest. If the females are not in the proper condition, then you need to delay light stimulation on this flock.
TRAINING
While having the birds in the right condition is the top priority, there are many other things that we can do, or items to look at, that will help ensure the females go to the nest.
Training the birds begins in the pullet barn. This is done by placing something in the pullet barn to simulate jumping up on to the slats, such as a perch rail or actual slat section for the birds to get up on. This should be done early, between the ages of three and four weeks to give an early brain imprint that jumping up is allowed.
The training of the birds continues after they are moved to the production barn. Once there walk the birds slowly to encourage them to get up out of the scratch area and onto the slats. Many have been hesitant to walk the slats but this will help move the birds to the nest when done correctly, especially on wider slats. Walking should be done on the outside edge of the slats in a slow manner that will encourage the birds to move toward the nests. After the birds are light stimulated, some customers walk the birds as much as once per hour to train them to go to the nest.
NEST SPACE
Having the proper nest space is also very important. If there is not enough space to easily accommodate the birds, they will look for a place outside the nest to lay their eggs. The minimum amount of nest space needed is one square meter of nest space per 100 birds. Another way to express this is 200 birds per nest segment of four nest openings of a 2.4 m long nest unit.
Opening the curtain at the nest entrance — while these curtains are there to shade the entrance to the nests, opening them will help get the birds into the nests. Many producers have seen that if they are having a problem with the birds just standing at the entrance to the nest, they can open these curtains to encourage the birds to go inside. They open the curtains by taping or clipping them to the top of the nests. While some have waited to see how the birds go to the nest before making the decision whether to open the curtains, many producers will start this practice when the flock is housed and the nests are opened. The recommendation is to open every other curtain. This allows the females to more easily see inside the nests and seems to make them more curious about going inside. These curtains can then be gradually lowered once it is seen that the majority of the birds are going to the nests. On certain nest systems, producers have opened the entire top of every other nest as an alternative to just opening the curtain. Some producers have opted to install a winch system allowing them to raise all the nest tops at the same time. They will not open them fully, just enough to allow the birds more space to enter into and see into the nest.
LIGHTING
Having the right intensity and even light distribution plays a big role in how the flock comes into production and where the hen wants to lay her egg. We want to see a minimum of 60 lux at bird level, and minimize the difference in distribution across the barn — this needs to be less than 20 per cent. Having this minimum light intensity and even light distribution will help eliminate shadows and dark areas that would encourage the birds to lay their eggs outside the nest.
EGG BELT
The egg belt should not be visible to the hen when she enters the nest. If the hen can see the moving belt, she is more likely to be scared out of the nest. Having the belt shielded properly will prevent the hen from seeing the belt. Small, plastic movable flaps are installed for this purpose.
LITTER DEPTH
Placing very little shavings in the barns helps to discourage the birds from laying eggs in the floor; 2-3 cm of shavings in the scratch area is sufficient. Additional shaving can be added to the scratch area post peak, if desired, but is normally not done due to the litter build-up giving additional litter depth.
EQUIPMENT LAYOUT
Drinker lines should be close enough to the nest entrance to help draw the birds to the nest. This distance is normally 60-70 cm from the nest entrance. Never place all the feed lines in the floor. Having part of the feeders on the floor and on the slats encourages the birds to use both areas. Spacing should be such that the birds can easily utilize the water line and all feed lines. Also, feeder height should be high enough so that the birds can move freely underneath the feed lines — approximately 20cm to the bottom of the feeder. Another option is to raise the feeder lines with an electric winch after the feed has been consumed. This is more important for pan feeder equipment placed on the slats, which tends to give more shaded areas. Chain feeder lines are normally placed directly on the slats and a bracket is used to keep the troughs horizontal.
WATER FLOW RATE
A low water flow rate will increase the time the birds have to spend at the drinker lines. A minimum flow rate of approximately 60-80 ml/min is desired. A low flow rate will cause a wall of birds between the hens trying to get to the nest and the nests themselves. If the hens cannot get to the nest because of this wall, they will simply lay their eggs outside the nest or drop them close to the drinker line. Many broken eggs are found under the slats at the drinker line area.
While there are many items that contribute to where the hen chooses to lay her egg, taking care of the basics goes a long way towards making sure the eggs do end up in the nest.
Print this page