Water Management: Go with the flow
By Al Dam
Features Barn ManagementBuilding a low-cost water flow meter for coffee money.
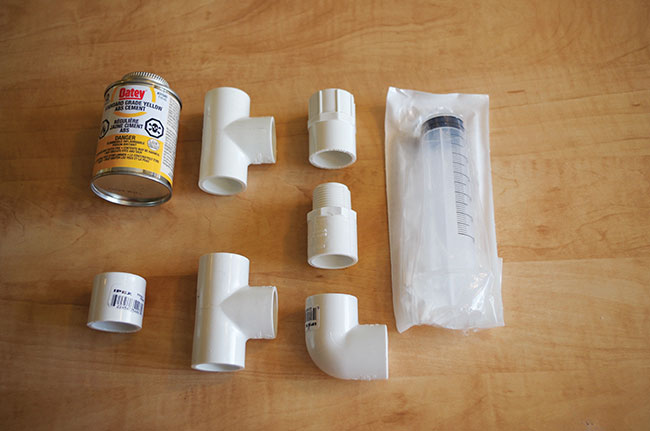 Figure 1. Pictured are all of the supplies you’ll need, which you can find at your local hardware store. Figure 1. Pictured are all of the supplies you’ll need, which you can find at your local hardware store.
A water flow meter is a simple, reusable device that allows a farmer to check the flow rate from drinking nipples at different areas in the barn. It is quite easy to build a flow meter and it can be sanitized and used repeatedly.
Checking water flow rate is important to make sure that all the birds are getting adequate amounts of water and that your water lines are working properly. Birds require twice as much water, by volume, as feed that they consume.
In hot weather, water requirements will increase substantially – up to almost twice as much as the regular amount. Thus, any restriction on flow means lost income and productivity and can have a significant effect on bird health and welfare.
Producers can build a simple flow meter with about 10 dollars’ worth of PVC tubing, tees, elbows, a syringe and a piece of mesh screen.
To begin, you will need to go to a local hardware store to acquire the necessary supplies, which are laid out in Figure 1. You’ll need:
- A five cm by five cm piece of mesh screen (metal mesh, as it needs to be stronger than fly screen).
- A 60 ml syringe (a 20 ml syringe if you want to use the rubber plunger tip as a plug for the handle).
- A hot glue gun (herein referred to as “hot glue”).
- Standard yellow PVC cement (herein referred to as “glue”).
- A saw or cutter.
- A one by half inch CPVC CTS slip x MPT male adapter.
- A two by half inch CPVC CTS slip x slip x slip tee.
- A one by half inch CPVC CTS 90-degree slip x slip elbow
- A one by half inch CPVC CTS slip x FPT female adapter.
- A one by half inch CPVC CTS end cap (optional for handle).
- And one meter (three feet) of half inch CPCV pipe (optional for handle).
Note that if you are an egg farmer with a cage system, you could simply just glue a piece of mesh screen to the top of a syringe and glue the needle end shut. Or, if you do not want a handle, you can opt out of the three feet of pipe, but you will need four pieces of half inch diameter CPVC, each one and a half inches long. The handle is meant for ergonomics so that you can check the line when it is set and close to the ground without having to be on your hands and knees.
Step 1. Take the three-foot-long PVC pipe and cut off four pieces that are one and a half inches long.
Step 2. Glue the end cap to the long PVC pipe. This will be used as your handle for the flow meter.
Step 3. Take the CPVC CTS slip x MPT male adapter and put a plug into the threaded part (e.g., a rubber stopper from a 20 mL syringe or a bottle cap that is hot glued in place).
Step 4. Glue the CPVC CTS slip x MPT male adapter with the plug onto the other end of the long PVC pipe used for the handle. Now you can screw the handle into the flow meter you will make next.
Step 5. Glue the pieces together as Figure 2 shows.
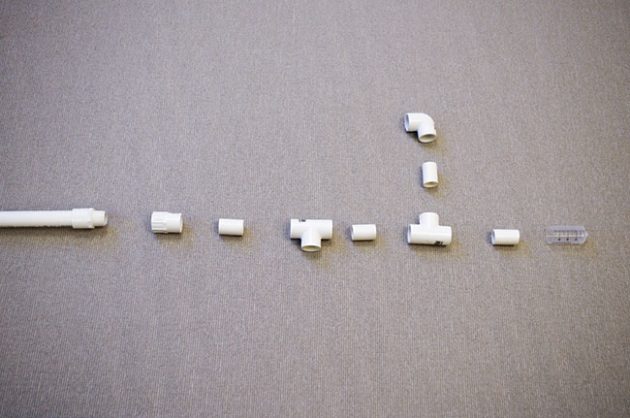
Figure 2
Step 6. Cut the mesh screen to cover the open end of the elbow and hot glue it in place, as seen in Figure 3.

Figure 3
Step 7. Take the plunger out of the 60 mL syringe and cut the syringe barrel at the 40 mL mark. Hot glue the tip of the syringe barrel to seal it.
Step 8. Hot glue the syringe barrel to the last end coupling piece, making sure that the 30 mL mark is visible below the coupler (see Figure 4).
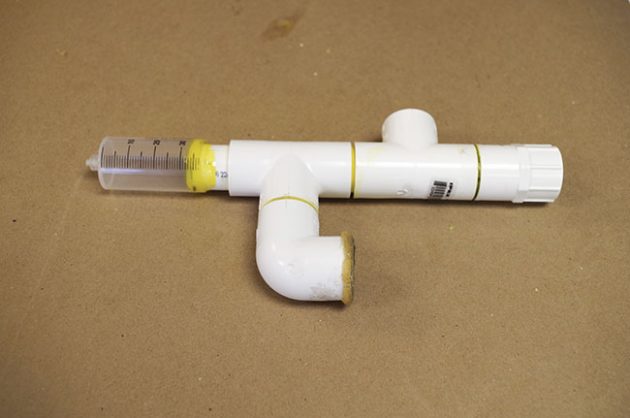
Figure 4
Step 9. Screw the handle onto the body.
You are now ready to use your flow meter! Just press the mesh against the nipple and allow the water to collect into the graduated cylinder for 15 seconds. By multiplying the amount of water collected by four, you will have your flow rate in mL/min. If you are checking a high flow nipple, collect water for 10 seconds and then multiply by six to get your mL/min flow. (I have taken the handle off for the purposes of the picture in Figure 5.)
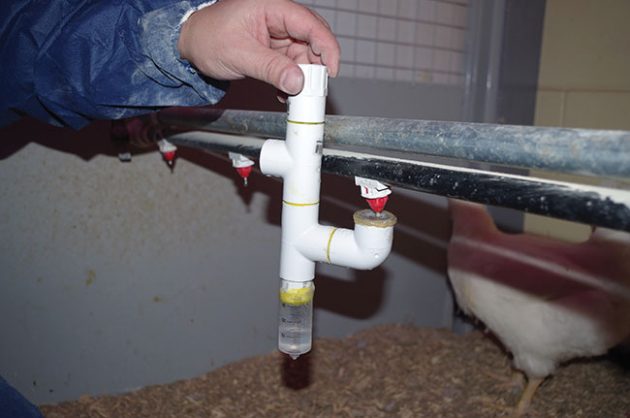
Figure 5
Between readings, empty the cylinder by tipping it back (Figure 6).
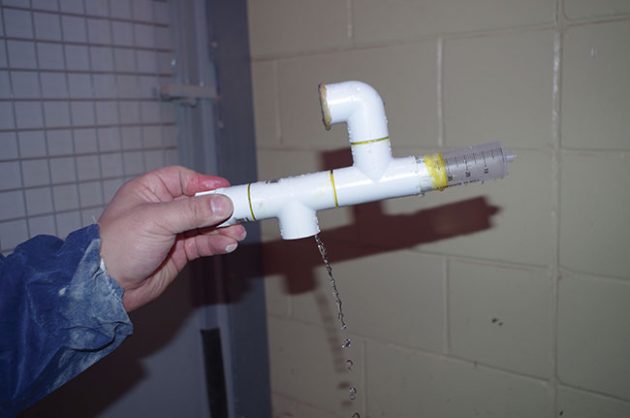
Figure 6
Check flow rates near the regulator, at a mid-point and at the farthest end of the drinking line. When they are similar, you will have adequate flow along the length of the line. Test flow rates at various pressures. When there is a higher demand for water, any restrictions will be more apparent. It is normal to have two to four mL/min differences in flow rates between nipples. If there are major differences, there is usually a blockage that needs to be cleared. This can be as simple as a round of cleaning, disinfecting and flushing.
Al Dam is provincial poultry specialist with the Ontario Ministry of Agriculture, Food and Rural Affairs.
Print this page